Apache Spark is one of the most popular framework for the big data processes. Spark is designed to handle massive datasets or real time data processing. And Scala is one of the most popular languages to write the Spark applications.
In this blog post I’ll guide you to write your first Spark Application in Scala. We’ll start with basics – setting up the environment, writing simple scala application and creating a JAR file out of it.
Pre-requisites:
Before you write your first applications, make sure you have below pre-requisites installed:
- Java: Spark applications run on JVM, so you need Java to be installed on your machine. You can download JDK from Here. (I have installed JDK-17.0.17)
- Scala: You’ll need Scala Plugin to be installed in your IDE. Follow environment Setup section.
- Apache Spark: Download Apache Spark from Here.
- IDE: For writing applications in Scala, I would prefere to use the IntelliJ Idea. If you want, you can also use VS Code or Eclipse. But IntelliJ IDEA provides reach set of features for Scala applications including debugging and syntax highlighting.
Environment Setup:
- Apache Spark Setup: Once you have Java installed, Download Apache Spark. I would suggest to download pre-built Spark Package with Hadoop. The downloaded file will be .tgz (GZipped Tar) file. You’ll need to unzip that file. After Unzip, setup the environment variable with key SPARK_HOME. Below are the steps to setup Environment Variable:
- Search “Edit Environment Variables” in windows search bar. Or Go to Control Panel -> System & Security -> System -> Advanced System Settings -> Click on Environment Variables.
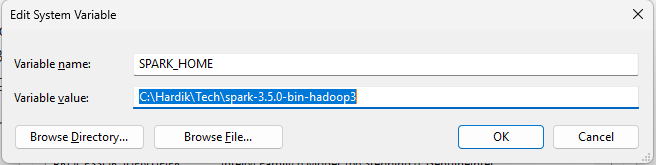
- In Environment Variables window, Click on the “New” button for System Variables.
- Add SPARK_HOME as variable Key & Path of the Unzipped Spark Package as the Variable Value shown as below:
- Install Scala Plugin: Open IntellI Idea -> Settings -> Plugins -> Scala -> Install.
- Create a Project: Create a New Project -> Select Scala From Left Window. Give the Project Name and Path and Make sure that you have selected sbt as a build system.
- Add Spark Dependencies: Once project is created, open build.sbt file and add spark dependencies:
libraryDependencies ++= Seq("org.apache.spark" %% "spark-core" % "3.5.0",
"org.apache.spark" %% "spark-sql" % "3.5.0")after adding dependencies, your build.sbt file looks like:
version := "0.1.0-SNAPSHOT"
scalaVersion := "2.13.12"
lazy val root = (project in file("."))
.settings(
name := "MyScalaProject",
)
libraryDependencies ++= Seq("org.apache.spark" %% "spark-core" % "3.5.0",
  "org.apache.spark" %% "spark-sql" % "3.5.0")
- Build SBT Project: Go to View -> Tools Window -> sbt. Click on refresh Icon to load all dependencies.
Write your first Spark Application:
Once all above steps completed, go to your project and create a new Scala File (Entry.scala) under src/main/scala. And add below code:
import org.apache.spark.sql.SparkSession


object Entry {
  def main(args: Array[String]): Unit = {

    // Create Spark Session
    val spark = SparkSession.builder()
      .appName("MyScalaProject")
      .master("local[*]")
      .getOrCreate()

    println("Spark Application Started")

    // Create Sample Data
    val data = Seq(
      ("Name-A", 30),
      ("Name-B", 35),
      ("Name-C", 60))

    import spark.implicits._
    val df = data.toDF("name", "age")

    df.show()

    // Data Refinement
    val result = df.filter($"age" > 30)

    println("People older than 30:")
    result.show()

    // Stop Spark session
    spark.stop()
    println("Spark application completed!")
  }
}
Code Understanding:
- import org.apache.spark.sql.SparkSession: required to create the Spark Session. (line 1)
- Create a Spark Session using SparkSession.Builder() (line 8-11)
- Create a local collection and convert it to DF: Using Seq we created a local collection and created a dataframe df having first column as a name and second as an age. (line 16-24)
- Display the DF: We print the dataframe using df.show() (line 24)
- Data Refinement: We filter the data and store the result in a variable named result. (line 27)
- Display the Result: Display the final result. (line 30)
- Stop Spark Session: Always stop the spark session when you are done to release resources. (Line 33)
Run your application:
In IntelliJ, right click on the Entry.scala file and select Run ‘Entry’ . You should see the following output in the Console:
Spark Application Started
+------+---+
|  name|age|
+------+---+
|Name-A| 30|
|Name-B| 35|
|Name-C| 60|
+------+---+
People older than 30:
+------+---+
|  name|age|
+------+---+
|Name-B| 35|
|Name-C| 60|
+------+---+
Spark application completed!Congratulations. You’ve created your first spark application. We’ve covered setting up the environment, creating first spark job, understanding the code and running it locally. You can try to experiment different data sources, performing ingestions, transformation and actions to get more familiarity with power of spark.